Example icacls Win2k

After cacls, xcacls.vbs, now we have icacls to set file and folder permissions.

Here are some practical examples.

Create a bunch of directories

md d:\apps
md d:\profiles
md d:\users

Share the directories. Note the offline caching; users are allowed to enable offline caching for their homedirs, other directories are disabled for offline caching.

net share apps=d:\apps /grant:everyone,FULL /CACHE:None
net share profiles=d:\profiles /grant:everyone,FULL /CACHE:None
net share users=d:\users /grant:everyone,FULL /CACHE:Manual

Now let’s script the ntfs permissions for the apps share:
– “(OI)(CI):F” means Full Control “This Folder, Subfolders and files”
– “(OI)(CI):M” means Modify “This Folder, Subfolders and files”
– “/inheritance:r” means remove all inherited ACL’s from parent

(OI) This folder and files
(CI) This folder and subfolders.
(OI)(CI) This folder, subfolders, and files.
(OI)(CI)(IO) Subfolders and files only.
(CI)(IO) Subfolders only.
(OI)(IO) Files only.

and the permission possibilities

perm is a permission mask and can be specified in one of two forms:
a sequence of simple rights:
N – no access
F – full access
M – modify access
RX – read and execute access
R – read-only access
W – write-only access
D – delete access
a comma-separated list in parentheses of specific rights:
DE – delete
RC – read control
WDAC – write DAC
WO – write owner
S – synchronize
AS – access system security
MA – maximum allowed
GR – generic read
GW – generic write
GE – generic execute
GA – generic all
RD – read data/list directory
WD – write data/add file
AD – append data/add subdirectory
REA – read extended attributes
WEA – write extended attributes
X – execute/traverse
DC – delete child
RA – read attributes
WA – write attributes

Here the discription of all the possible NTFS permissions

Permission Description
Traverse Folder/Execute File For folders: Traverse Folder allows or denies moving through folders to reach other files or folders, even if the user has no permissions for the traversed folders. (Applies to folders only.) Traverse folder takes effect only when the group or user is not granted the Bypass traverse checking user right in the Group Policy snap-in. (By default, the Everyone group is given the Bypass traverse checking user right.)

For files: Execute File allows or denies running program files. (Applies to files only).

Setting the Traverse Folder permission on a folder does not automatically set the Execute File permission on all files within that folder.

List Folder/Read Data List Folder allows or denies viewing file names and subfolder names within the folder. List Folder only affects the contents of that folder and does not affect whether the folder you are setting the permission on will be listed. (Applies to folders only.)

Read Data allows or denies viewing data in files. (Applies to files only.)

Read Attributes Allows or denies viewing the attributes of a file or folder, such as read-only and hidden. Attributes are defined by NTFS.
Read Extended Attributes Allows or denies viewing the extended attributes of a file or folder. Extended attributes are defined by programs and may vary by program.
Create Files/Write Data Create Files allows or denies creating files within the folder. (Applies to folders only).

Write Data allows or denies making changes to the file and overwriting existing content. (Applies to files only.)

Create Folders/Append Data Create Folders allows or denies creating folders within the folder. (Applies to folders only.)

Append Data allows or denies making changes to the end of the file but not changing, deleting, or overwriting existing data. (Applies to files only.)

Write Attributes Allows or denies changing the attributes of a file or folder, such as read-only or hidden. Attributes are defined by NTFS.

The Write Attributes permission does not imply creating or deleting files or folders, it only includes the permission to make changes to the attributes of a file or folder. In order to allow (or deny) create or delete operations, see Create Files/Write Data, Create Folders/Append Data, Delete Subfolders and Files, and Delete.

Write Extended Attributes Allows or denies changing the extended attributes of a file or folder. Extended attributes are defined by programs and may vary by program.

The Write Extended Attributes permission does not imply creating or deleting files or folders, it only includes the permission to make changes to the attributes of a file or folder. In order to allow (or deny) create or delete operations, see Create Files/Write Data, Create Folders/Append Data, Delete Subfolders and Files, and Delete.

Delete Subfolders and Files Allows or denies deleting subfolders and files, even if the Delete permission has not been granted on the subfolder or file. (Applies to folders.)
Delete Allows or denies deleting the file or folder. If you do not have Delete permission on a file or folder, you can still delete it if you have been granted Delete Subfolders and Files on the parent folder.
Read Permissions Allows or denies reading permissions of the file or folder, such as Full Control, Read, and Write.
Change Permissions Allows or denies changing permissions of the file or folder, such as Full Control, Read, and Write.
Take Ownership Allows or denies taking ownership of the file or folder. The owner of a file or folder can always change permissions on it, regardless of any existing permissions that protect the file or folder.
Synchronize Allows or denies different threads to wait on the handle for the file or folder and synchronize with another thread that may signal it. This permission applies only to multithreaded, multiprocess programs.
Example:

icacls "d:\apps" /grant "domain admins":(OI)(CI)F /inheritance:r
icacls "d:\apps" /grant "everyone":(OI)(CI)M /inheritance:r

On the profiles share, only the “domain admins” should be allowed to enter all “Folders, Subfolders and files” (hence the (OI)(CI):F) , everyone else should be able to to ready “this folder only”.
So without an combination of (CI) and/or (OI) it means “this folder only”

icacls "d:\profiles" /grant "domain admins":(OI)(CI)F /inheritance:r
icacls "d:\profiles" /grant "everyone":R /inheritance:r

Upon creating a new user, the Domain Admin should manually create a profile folder for the user and add the user with appropriate rights.

The same goes for the users share containing the homedirectories of all users

icacls "d:\users" /grant "domain admins":(OI)(CI)F /inheritance:r
icacls "d:\users" /grant "everyone":R /inheritance:r

Want to reset NTFS permissions from the command line? Use this syntax:

icacls “c:\users\jshipp\*” /q /c /t /reset

This is the same as using the GUI command:
Replace all child object permissions with inheritable permissions from this object
Win7 – Replace all child object permissions with inheritable permissions from this object
WinXP – Replace permission entries on all child objects with entries shown here that apply to child objects

Warning: If you leave out the * then the jshipp folder will have the same permissions as the users folder, which is not what the GUI does, and probably not what you want, but it’s nice to know it’s possible.

Example takeown

takeown /f folder_name /r /d y
icacls folder_name /grant username_or_usergroup:F /t /q

Crétidos para: 
http://support.randomsolutions.nl/
ss64cmd.com


A little relaxation. Motorcycles engines by type.

Guide to Types of Motorcycle Engines

Have you ever wondered why there are so many different types of motorcycle engines, and what makes one kind of engine so different from another? We go through everything from big thumpers to boxer twins to outrageous inline-sixes, and explain all the strengths and weaknesses of each, in this Motorcycle Engine Guide!

Singles

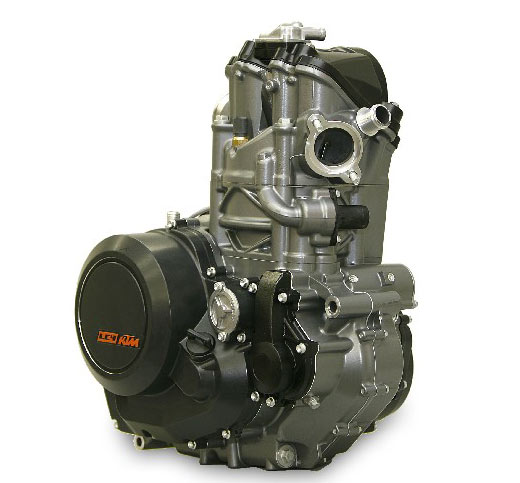
ktm-690-single-cylinder

The internal combustion engine doesn’t get any simpler than this; one big cylinder thumping away to create power. Simple in operation, cheap to produce, and easy to repair and maintain, single-cylinder engines lend themselves to use in economy motorcycles and scooters, and have powered millions of budget bikes the world over.

But that’s not the only place they’re at home; the thumping power pulse and good bottom end torque of a big single is also ideally suited to dirt riding. Virtually every dirt bike and many dual sports also run on single-cylinder engines, affectionately called “thumpers” for the pounding vibration and sound they create.

Found in:

  • Virtually all dirt bikes and supermotos
  • Most dual-sports
  • Economy bikes like the Honda CBR300R

Strengths:

  • Light and narrow
  • Mechanically simple
  • Good bottom-end torque

Weaknesses:

  • Serious vibration; require a larger flywheel and the use of balancers to counteract it
  • Almost always create a lower power to weight ratio than multi-cylinder engines of similar displacement
  • Not suited to larger displacements

Parallel Twin

triumph-bonneville-parallel-twin

When you think of a twin-cylinder motorcycle engine, your mind probably goes straight to the “Big Twins” that power most American cruisers. But you can’t forget about the compact and economical parallel twin (or inline-two cylinder) engines that are characteristic of many bikes in history, such as the signature mill that powers the Triumph Bonneville. But the parallel twin is not just some relic; fast revving, high-performance versions of this engine configuration also power the sporty Kawasaki Ninja 300 and the even sportier all-new Yamaha R3.

Found in:

  • Many lower-end sport bikes
  • Iconic cruisers and standards
  • BMW dual-sports (F650GS, F800GS)

Strengths:

  • Narrow and light
  • Responsive
  • Easy and relatively cheap to manufacture
  • Good for general riding and commuting

Weaknesses:

  • Noticeable vibration (can be worse than in comparable V-twins)

V-Twin

harley-davidson-v-twin

The most iconic and recognizable motorcycle engine, especially here in the States, is undoubtedly the V-twin. With two big cylinders oriented in a “V” pattern, the “Big Twin” engine powers virtually every American cruiser (and even many Japanese ones.) The thick powerband, off-the-line torque, and most of all, the signature V-twin sound have been the keys to the V-twin’s persistent popularity through the decades.

V-twins generally put out less power than similar-sized inline-4 counterparts, though they make up for it with the brute torque inherent to the V-twin’s architecture. But V-twins can be fast too; just look to Ducati for inspiration about what a performance-tuned V-twin can do. The Italian sport bike manufacturer has been building and racing high-performance V-twins for a long time, and is cranking out an incredible 205 HP from the engine in the new 1299 Panigale.

Found In:

  • Virtually all American cruisers
  • Virtually all Ducatis
  • Mounted transversely in Moto Guzzis

Strengths

  • Plenty of torque and a wide powerband
  • Narrow
  • Low center of gravity
  • That unmistakable V-twin sound!

Weaknesses

  • Can have vibration issues (especially in narrower V-configurations)
  • Difficulty cooling the rear cylinder
  • Create less power per unit of displacement than 3 or 4-cylinder engines

Boxer Twin

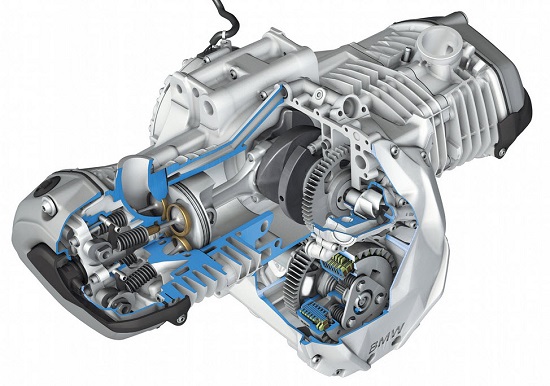
bmw-gs-boxer-twin
bmw-gs-boxer-twin

If you’re looking at a boxer twin in a motorcycle, more than likely you’re looking at a BMW; the odd-looking engine layout has been a signature part of the German manufacturer’s motorcycle designs for the better part of a century. The boxer twin is perfectly balanced, smooth, and delivers gobs of torque across the entire powerband.

It’s from this unique engine layout that the ubiquitous BMW GS, the most popular bike with a boxer twin, gets its ability to “tractor” its way through the toughest terrain in the world; those two big cylinders thump out enough torque to get the 600-pound bikes through just about anything, even at just above idle. It may not be the sexiest-looking engine ever put in a bike, but the boxer twin certainly has its strengths.

Found In:

  • Lots of BMWs

Strengths:

  • Torquey
  • Perfectly balanced, and a low center of gravity
  • Linear powerband and smooth power delivery
  • Perfectly suited to shaft-drive motorcycles

Weaknesses

  • Wide and unwieldy
  • Limited lean angle
  • Torque reaction on motorcycle in corners

Triple

triumph-triple-engine

The perfect middle ground between torquey twins and revvy inline fours, the triple is not traditionally one of the most popular engine architectures – but those who ride them swear by them. Triples are a mainstay of Triumph’s model lineup, powering all of their sport motorcycles, and are gaining in popularity in models such as the new Yamaha FZ-09.

While triples don’t typically boast the same high horsepower numbers of inline fours or the grunty torque of big twins, they are a great balance of both, making them perfect for everything from commuting around town to aggressive track riding.

Found in:

  • Any Triumph sport bike
  • Sportier bikes in Yamaha’s lineup (FZ-09, FJ-09)
  • A behemoth 2294cc also triple powers Triumph’s over-the-top Rocket III roadster

Strengths

  • Perfect balance of characteristics of twins and inline fours
  • Versatility; work well in all ridings situations
  • Unique exhaust sound
  • Narrow and compact profile

Weaknesses

  • Hmmm…

Inline-4

yamaha-r6-inline-4-engine

The smooth, fast-revving, extremely popular inline-4 is a universal engine architecture that powers most sport bikes you can think of. Since its introduction on the iconic Honda CB750 in the late 1960s, the inline-4 grew in popularity among the Japanese manufacturers for its ease of production, reliability, and good performance.

Today, they power virtually every Japanese sport bike, and the vast majority of road racing bikes in any supersport or superbike class in the world. Sport bike riders love the inline-4 for its smooth power delivery, screaming high revs, and the exhilarating top-end rush most performance inline-4s deliver.

Found in:

  • Most sport bikes, especially from Japanese manufacturers

Strengths

  • Simplicity and popularity of engine architecture
  • Smooth power delivery
  • Fast-revving
  • Cranking out big horsepower, especially at high RPMs

Weaknesses

  • They need to scream; most are tuned for higher-end power
  • Torque is not their strong point
  • Can be a little wide

V-4

honda-vfr-v4-engine

While the triple can be considered to be the ideal “middle ground” between twins and four-cylinder engines, another unique – though somewhat more costly – middle ground between those two designs is the V-4. The complexity and cost associated with manufacturing V-4s keeps OEMs from putting them in anything but higher-end models, but those that ride with them love the smooth power delivery, high performance, and narrow profile. The best part about V-4s is probably their unique sound; as essentially half of a V8, they have a unique, throaty growl that is pure performance.

Found in:

  • Higher end sport and sport-touring models (Honda VFR models, Yamaha V-max, Aprilia RSV4)
  • World class MotoGP machines (Honda RC213V, Ducati Desmosedici)

Strengths

  • Smooth, torquey power delivery
  • High performance
  • Narrow profile
  • Incredible V4 sound

Weaknesses

  • Complex and expensive to manufacture
  • Often heavier than comparable inline-4s

Unusual Engines Worth Mentioning

Inline-6

honda-cbx-inline-six

An unusual, impractical engine choice for a motorcycle, the inline-six has no logical place in a motorcycle – unless it’s for a manufacturer to show off a feat of engineering (or an owner to show off at bike night.) The inline-six powered Honda CBX was not the only bike ever with an inline-six, but is the most iconic. The Kawasaki Z1300, produced from 1979-1989, sported an even bigger inline-6 powerplant.

Flat-4

honda-goldwing-flat-four

The flat-4, with four cylinders arranged in opposing pairs (like a pair of boxer-twins) is best known for powering the original Honda Gold Wing, the GL1000. This architecture allows for excellent balance, plenty of torque, and a low center of gravity, but is expensive to manufacture.

Flat-6

honda-goldwing-flat-six

Add two cylinders to the flat-4 and you get the flat-6, which powers the GL1000s big brother, the GL1800 Gold Wing. Like the flat-4, the flat-6 is torquey, has smooth power delivery, and has a low center of gravity, and is perfect for a big touring bike like the Gold Wing.

Oval-piston V-4

nr750-engine

One of the most unusual production engines ever built, the oval-piston V-4 in the Honda NR, a wildly expensive production racer built by Honda in the 1980s, was and still is a marvel of engineering. Honda’s engineers attempted to capitalize on Grand Prix rules that required a maximum of four cylinders by making a “virtual V8”, with four oval shaped cylinders, each one with two connecting rods and 8 valves. The unique engine never translated to success on the track – but it sure is neat to look at.


Credit: http://www.bikebandit.com/


Linux para administradores do Windows Server

Às vezes, mesmo um administrador de Windows tem que sujar as mãos e tocar um servidor Linux de algum tipo. O dia chegará quando o cara Linux está fora e algo precisa de conserto! Nesta série de artigos que eu espero para cobrir as noções básicas de administração do Linux. No post de hoje, vou começar com o básico do Linux e fazer o login e explorar meios montados, e como alternar entre usuários e gerenciar usuários.

Nestes tutoriais Estou usando CentOS 6, um clone RedHat que é quase idêntico ao RedHat , menos as marcas . Você pode baixar e usar o CentOS 6 para livre. CentOS é apenas uma das várias distribuições ( também conhecidos como ” distros “) . Eu escolhi isso por nenhuma outra razão do que preferência pessoal, e que também é uma das distribuições mais populares utilizados e apoiados por um grande fornecedor.

Outras distribuições Linux populares são SuSE , Debian, Ubuntu e do sempre popular. A maioria dos comandos e da teoria vamos entrar neste trabalho série bem em todas as distribuições Linux tradicionais . Você deve ser capaz de baixar facilmente a distro que leva a sua fantasia . Essas distros geralmente vem como um instalador ISO inicializável. A única área que varia é a instalação de software.

Embora o Linux tem uma interface gráfica opcional , muito poucos servidores Linux usá-lo. Portanto, este tutorial irá concentrar-se sobre a utilização do CLI para gerir a máquina. Ponto importante : Por favor, esteja ciente de que todos os comandos do Linux são minúsculas ( os interruptores não podem ser embora) e Linux diferencia maiúsculas de minúsculas .

Usando PuTTY


Obviamente, não existe RDP no servidor Linux, então como é que um administrador se conectar a um servidor Linux, em primeira instância? Ele é feito por meio de um aplicativo de shell seguro (SSH). Um usuário pode fazer login no CLI usando um cliente SSH. Um cliente muito popular e gratuito que eu recomendo é “PuTTY”.

putty configuratin linux

Faça o download e abrir o cliente PuTTY, e preencher os campos de nome de usuário, senha e endereço do servidor para a caixa de Linux em questão. Uma sugestão que eu gostaria de fazer é que, se você é realmente novo no Linux, rodando uma máquina de teste em um ambiente virtual é sábio – desta forma os erros não resultam em lágrimas. Posso recomendar vivamente Virtualbox. Este é um muito bom ambiente virtual, e ainda melhor, ele está livre para usar.

Usando Secure Shell


Ao ligar para o secure shell, um administrador pode obter erros como “nome de usuário ou senha incorreta” se eles tentarem fazer o login como usuário root, o equivalente do administrador local do Windows. Isso ocorre porque o SSH é projetado para ser mais seguro possível. Sem a modificação, os usuários só podem fazer login com as credenciais não-root e depois mudar para o usuário root.

linux putty login using secure shell

Há uma solução fácil para o erro acima. Um administrador será necessário criar um usuário no console do servidor ou usando PuTTY se eles têm os direitos de usuário corretos. É possível dizer imediatamente se logado como root porque o prompt CLI terá # ao invés de um ~. O usuário atual também pode ser adquirida através do whoami comando, que faz o que diz na lata : dá o nome do usuário atual.

Criar e adicionar usuários


Adicione o usuário digitando useradd , seguido do nome de login desejado para criar . Um exemplo seria sburns useradd . Este vai seguir com algumas perguntas para responder e, finalmente, criar o usuário. Agora você deve ser capaz de entrar com massa de vidraceiro. Uma vez logado como usuário sem privilégios , o administrador pode elevar seus privilégios de root.

Usando su – permitirá que um usuário para alternar entre os usuários , mesmo raiz , desde que o usuário saiba a senha relevante. O comando em si é uma abreviação para Como root um administrador pode mudar a qualquer outro usuário usando o comando su simon (ou projeto de lei su ou quem ), assumindo a senha é conhecido o “usuário switch. ” . “-” Opção é usada para dar todas as variáveis ​​ambientais utilizando su – . , sem especificar um usuário vai assumir que você quer mudar para o usuário root Há um arquivo chamado / etc / sudoers que mantém a configuração para su. .

Então, agora nós está logado, permite cobrir alguns itens relacionados com o sistema de arquivo rudimentares . Quando conectado como um usuário normal, que seria inicialmente colocado no seu diretório home que foi criado quando o usuário foi criado , como foi mostrado antes. Mova sobre o sistema usando o comando cd , o mesmo que o Windows , mas lembre-se que o Linux é sensível a maiúsculas.

Usando o CLI Linux


Com o Linux , a barra invertida se torna uma barra. Para voltar para o seu próprio diretório de casa a qualquer momento, basta digitar cd sem argumentos . Se você também não tem certeza de onde você está na estrutura do arquivo , há um comando chamado pwd . Este comando irá dar o caminho completo para a sua localização actual . Este é um comando muito útil, especialmente se você tiver muitas janelas abertas – e verifique antes de usar comandos potencialmente perigosos !

Gerenciando Drives com Linux


Linux não tem noção de mapeamentos da letra de unidade . Em vez disso, as letras de unidade para mapear o que são conhecidos como pontos de montagem. Um exemplo muito rudimentar é com discos CD-ROM . No Windows, quando um CD é inserido, ele é montado como uma letra de unidade . Por exemplo, E: Isso é diferente no Linux , porque quando você monta um CD, ele essencialmente vincula o conteúdo de um CD para uma pasta. Algo a ter em mente é que, como regra máquinas Linux não montar auto mídia.

Um administrador teria que montar o CD e vinculá-lo a uma pasta. A maioria das distribuições Linux modernas vêm com uma pasta de mídia para essa finalidade. Para montar um CD , use o comando mount / dev / cdrom / media. Da mesma forma, para desmontar um disco , use o comando umount / media. Este método de montagem não é apenas para CDs , mas também para pen drives , discos rígidos, ea maioria dos outros meios de comunicação, ainda que com algumas opções ocasionais para especificar os sistemas de arquivos e tal.

Managing drives with Linux mount media

Para ver o que está montado atualmente , digite o comando de montagem. Montagens padrão são armazenadas no arquivo / etc / fstsab . Você pode modificar este arquivo para adicionar pontos de montagem adicionais, se você quiser adicionar os sistemas de armazenamento adicionais durante o boot. Pro dicas : Primeiro, certifique-se de ter um backup (use o comando cp / etc / fstab fstab.bak ) . Em segundo lugar , use o comando mount-a para verificar o arquivo fstab ainda é válido antes de reiniciá-lo e descobrir que ele não é!

Agora pode ser um bom momento para apresentá-lo à forma como a maioria das instalações Linux são organizadas a partir de um arquivo e perspectiva diretório.

/ – Raiz , como no nível superior do disco
/ home – diretórios onde os usuários domésticos e dados pessoais estão localizados
/ boot – contém arquivos de inicialização importantes. Você raramente vai precisar passar por aqui
/ dev – contém dispositivos pseudo que apontam diretamente para o hardware
/ root – o diretório raiz para casa, e onde uma raiz pode armazenar seus arquivos
/ etc – contém todos os arquivos de configuração para praticamente tudo : redes , serviços e algumas aplicações
/ mount – Esta pasta é usada para montar montagens NFS e mídias removíveis
/ var – Contém muitos componentes do sistema , logs e miscelânea
/ proc – Contém informações sobre os processos em execução .
/ bin – Contém arquivos de programa
/ sbin – Contém administração do sistema de arquivos binários
Úteis Comandos CLI Linux

Úteis Comandos CLI Linux


Ao trabalhar com arquivos , há alguns comandos úteis que você pode executar para ajudar você a gerenciá-los , como o Linux não tendem a fazer extensões de arquivo . Se você quer saber que tipo de arquivo que você está olhando , você pode usar o arquivo de arquivo de comando, e ele vai interrogar o arquivo e fornecer todas as informações que puder reunir.

Para visualizar arquivos legíveis , você pode usar o comando cat . Para editar um arquivo , use o editor nano ( por exemplo, nome do arquivo nano ) .

Se você precisa encontrar um arquivo, você pode usar o comando localizar. Por exemplo, para localizar redhat-release ( Este arquivo contém as informações de lançamento para o RedHat Build) use o comando localizar redhat -release.

Outros comandos úteis que podemos usar agora são df, que dá estatísticas de espaço em disco . Usando df- h pode ser uma opção melhor , pois dá tamanhos em formato legível de megabytes , gigabytes , e tal , em vez de um tamanho difícil de manejar em bytes.

Managing drives with Linux disk free

Se você quer mudar sua senha agora, você pode usar o comando passwd. Usado sem opções, ele permitirá que você altere a senha do usuário que você está logado como. Se você estiver logado como root, você pode alterar as senhas de outras pessoas, usando o comando passwd, seguido do nome de usuário. Um exemplo seria passwd stuart.

Também é possível editar a configuração do usuário pelo uso do comando usermod. Isto irá permitir que você gerencie e modificar as configurações em uma base por usuário; por exemplo, a alteração do nome de usuário ou diretório home.

Esperamos que agora você entende o básico de fazer o login e explorar meios montados, e como alternar entre usuários e gerenciar usuários. Na próxima parte desta série, vamos olhar para gerenciamento de serviços, instalação de software, e como manter seu sistema atualizado.

Fonte: http://www.petri.co.il/linux-for-windows-server-administrator.htm

GRRF da Caixa: configuração para usuário limitado do Windows

Nosso objetivo é ajudar administradores de sistemas e infraestrutura de TI a fazer o aplicativo GRRF da Caixa Econômica Federal a funcionar em um computador cujo usuário não é membro do grupo Administradores, do Windows. Por padrão, esse aplicativo só funciona se o usuário for Administrador ou se “executar como” administrador.

  1. Configurar permissão total nos arquivos abaixo, localizados em C:\WINDOWS\SYSTEM32\
    Hl_med32.dll
    Hl_pub32.dll
    Hlsoft32.dll
  2. Dê permissão total também no diretório C:\WINDOWS\PREFETCH
  3. Dê permissão total também em C:\Arquivos de programas\Caixa
  4. Com regedit.exe, dê permissão total em HKLM\SOFTWARES\Caixa
  5. Se for AD, crie uma GPO ou se for configuração em computador local, sem domínio, faça as configurações utilizando o Gpedit.msc
    Gpedit.msc
    Diretivas de Computador Local > Configurações do Windows > Configurações de Segurança > Diretivas Locais > Atribuição de Direitos de Usuário > ‘Criar Objetos Globais’ > Adicionar o usuário ou grupo.

Pronto, você acabou de arrumar um programa porcamente mal feito, do governo brasileiro.

ePolicy Orchestrator 5.0 installation / patch upgrade checklist for known issues

Technical Articles ID:    KB76739
Last Modified:    August 13, 2013
 

Environment

McAfee ePolicy Orchestrator 5.0

For details of all supported operating systems, see KB51109.

Summary

The following is an upgrade checklist for known issues with full product installations and patch upgrades for ePolicy Orchestrator (ePO) 5.0.

McAfee recommends that you perform these operations directly on the ePO server and not through a remote connection. If you must use a remote connection, ensure that you are connected using the console session (session 0).


Back up your ePO server
For more information, see: 

  • ePO 4.6/4.5 – KB66616 – ePO 4.5 and 4.6 server backup and disaster recovery procedure 
     

Review the product or patch release notes for known issues and new features 

See the McAfee Product Documentation page at: https://mysupport.mcafee.com/Eservice/productdocuments.aspx

Ensure that the ePO server has enough Hard Disk Space for the upgrade

  • System Temp folder – Requires 2 GB or more.
  • ePO Installation folder – Requires the same size as McAfee\ePolicy Orchestrator folder.

    NOTE: If the ePO server is installed in C:\Program Files\McAfee\ePolicy Orchestrator and the ePolicy Orchestrator folder is about 1.5 GB in size, the required available Hard Disk space in C drive will be more than 1.5 GB.


Disable ePO server tasks and any Windows scheduled tasks that may be set to run on the ePO server
Disable any tasks that would interfere with the installation (such as purge events, pull tasks, and replication tasks).

For information on editing tasks, see the product guide for your version of ePO: 

  • PD24350 – ePolicy Orchestrator 5.0 Product Guide
  • PD22975 – ePolicy Orchestrator 4.6 Product Guide
  • PD21812 – ePolicy Orchestrator 4.5 Product Guide

Disable Windows updates
Disable Windows updates to ensure they do not interfere with your ePO installation or upgrade. For more information, see:http://windows.microsoft.com/en-US/windows-vista/Turn-automatic-updating-on-or-off
 

Disable third-party software
Disable any software that automatically restarts services on your ePO server.

Ensure correct account permissions
The account used to access the SQL server must have the following permissions:


Default database 
must be Master
  1. Click StartProgramsMicrosoft SQL ServerSQL Server Management Studio.
  2. Expand SecurityLogins
  3. Right-click the account and select Properties.
  4. Ensure the default database is set to master.
  5. Expand User Mapping and ensure that account has dbo in the schema for the database.
This account must the db_owner in the database security properties:
  1. Click StartProgramsMicrosoft SQL ServerSQL Server Management Studio.
  2. Expand Databases, your ePO database, SecurityUsers.
  3. Right-click the dbo account and select Properties
  4. Ensure that account has dbo in the Default schema for the database.
If you use an NT account to authenticate to the ePO database, ensure that account has Local Admin rights on the ePO server.

See KB75766 for detailed information on the required SQL permissions.


Ensure Auto Close is set to False for the ePO database
  1. Click StartProgramsMicrosoft SQL ServerSQL Server Management Studio.
  2. Right-click the ePO database and select Properties.
  3. Click Options and ensure Auto Close is set to False. If not, click Auto Close, select False, and click OK.
 
Export your current policies
Use the Export function in ePO to back up your existing policies. See the ePO Product Guide for detailed information about exporting policies.
 

Ensure the SQL browser service is running
  1. Click StartRun, type services.msc and click OK.
  2. Locate the SQL Server Browser service and ensure that it is started and running.
  3. If not, right-click the SQL Server Browser service and select Start.
Ensure SQL Force Encryption is disabled in SQL server environments, if it is enabled.
  1. Click StartAll ProgramsConfiguration ToolsSQL Server Configuration Manager
  2. Right-click Protocols for <instance_name> (MSSQLSERVER by default) under SQL Server Network Configuration and click Properties.
  3. Click the drop-down for Force Encryption and select No.
  4. Click OK.

Enable TCP/IP on the ePO server

  1. Click StartRun, type Cliconfg and click OK.
  2. Ensure the TCP/IP protocol is Enabled and at the top of the Enabled protocols by order list.

Verify the correct DB collation is set on the SQL server
ePO uses SQL_Latin1_General_CP1_CI_AS as the default collation for the database when an upgrade or fresh installation of ePO is performed.
To verify collation in SQL Server:
  1. Click StartProgramsMicrosoft SQL ServerSQL Server Management Studio.
  2. Log on to the server using Windows Authentication or SQL Server Authentication, as applicable.
  3. In Object Explorer, expand Databases and locate the ePO database.
  4. Right-click the ePO database and select Properties.
  5. Review the Collation field in the General page.
See KB73717 for detailed information on supported collation types for ePO. 

In a pure IPv6 environment, ensure that only IPv6 is enabled on the SQL server that hosts the ePO database
See the following article for detailed information:

KB66179 – ePO 4.5 fails to install on Windows 2008 server with IPv6 enabled when remote SQL 2005 server has both IPv4 and IPv6 enabled


Ensure that the ePO admin and SQL account usernames and passwords meet the criteria described in KB66286


Related Information

PD24349 – ePolicy Orchestrator 5.0 Installation Guide
 

Rate this Page

Please take a moment to complete this form to help us better serve you.

ePolicy Orchestrator 5.0 installation / patch upgrade checklist for known issues

Environment
McAfee ePolicy Orchestrator 5.0

For details of all supported operating systems, see KB51109.
Summary
The following is an upgrade checklist for known issues with full product installations and patch upgrades for ePolicy Orchestrator (ePO) 5.0.

McAfee recommends that you perform these operations directly on the ePO server and not through a remote connection. If you must use a remote connection, ensure that you are connected using the console session (session 0).

Back up your ePO server
For more information, see:
ePO 4.6/4.5 – KB66616 – ePO 4.5 and 4.6 server backup and disaster recovery procedure

Review the product or patch release notes for known issues and new features
See the McAfee Product Documentation page at: https://mysupport.mcafee.com/Eservice/productdocuments.aspx

Ensure that the ePO server has enough Hard Disk Space for the upgrade
System Temp folder – Requires 2 GB or more.
ePO Installation folder – Requires the same size as McAfee\ePolicy Orchestrator folder.

NOTE: If the ePO server is installed in C:\Program Files\McAfee\ePolicy Orchestrator and the ePolicy Orchestrator folder is about 1.5 GB in size, the required available Hard Disk space in C drive will be more than 1.5 GB.

Disable ePO server tasks and any Windows scheduled tasks that may be set to run on the ePO server
Disable any tasks that would interfere with the installation (such as purge events, pull tasks, and replication tasks).

For information on editing tasks, see the product guide for your version of ePO:
PD24350 – ePolicy Orchestrator 5.0 Product Guide
PD22975 – ePolicy Orchestrator 4.6 Product Guide
PD21812 – ePolicy Orchestrator 4.5 Product Guide
Disable Windows updates
Disable Windows updates to ensure they do not interfere with your ePO installation or upgrade. For more information, see: http://windows.microsoft.com/en-US/windows-vista/Turn-automatic-updating-on-or-off

Disable third-party software
Disable any software that automatically restarts services on your ePO server.

Ensure correct account permissions
The account used to access the SQL server must have the following permissions:

Default database must be Master
Click Start, Programs, Microsoft SQL Server, SQL Server Management Studio.
Expand Security, Logins.
Right-click the account and select Properties.
Ensure the default database is set to master.
Expand User Mapping and ensure that account has dbo in the schema for the database.
This account must the db_owner in the database security properties:
Click Start, Programs, Microsoft SQL Server, SQL Server Management Studio.
Expand Databases, your ePO database, Security, Users.
Right-click the dbo account and select Properties.
Ensure that account has dbo in the Default schema for the database.
If you use an NT account to authenticate to the ePO database, ensure that account has Local Admin rights on the ePO server.

See KB75766 for detailed information on the required SQL permissions.

Ensure Auto Close is set to False for the ePO database
Click Start, Programs, Microsoft SQL Server, SQL Server Management Studio.
Right-click the ePO database and select Properties.
Click Options and ensure Auto Close is set to False. If not, click Auto Close, select False, and click OK.

Export your current policies
Use the Export function in ePO to back up your existing policies. See the ePO Product Guide for detailed information about exporting policies.

Ensure the SQL browser service is running
Click Start, Run, type services.msc and click OK.
Locate the SQL Server Browser service and ensure that it is started and running.
If not, right-click the SQL Server Browser service and select Start.
Ensure SQL Force Encryption is disabled in SQL server environments, if it is enabled.
Click Start, All Programs, Configuration Tools, SQL Server Configuration Manager.
Right-click Protocols for (MSSQLSERVER by default) under SQL Server Network Configuration and click Properties.
Click the drop-down for Force Encryption and select No.
Click OK.
Enable TCP/IP on the ePO server
Click Start, Run, type Cliconfg and click OK.
Ensure the TCP/IP protocol is Enabled and at the top of the Enabled protocols by order list.

Verify the correct DB collation is set on the SQL server
ePO uses SQL_Latin1_General_CP1_CI_AS as the default collation for the database when an upgrade or fresh installation of ePO is performed.

To verify collation in SQL Server:
Click Start, Programs, Microsoft SQL Server, SQL Server Management Studio.
Log on to the server using Windows Authentication or SQL Server Authentication, as applicable.
In Object Explorer, expand Databases and locate the ePO database.
Right-click the ePO database and select Properties.
Review the Collation field in the General page.
See KB73717 for detailed information on supported collation types for ePO.

In a pure IPv6 environment, ensure that only IPv6 is enabled on the SQL server that hosts the ePO database
See the following article for detailed information:

KB66179 – ePO 4.5 fails to install on Windows 2008 server with IPv6 enabled when remote SQL 2005 server has both IPv4 and IPv6 enabled

Ensure that the ePO admin and SQL account usernames and passwords meet the criteria described in KB66286.

Related Information
PD24349 – ePolicy Orchestrator 5.0 Installation Guide

Rate this Page
Please take a moment to complete this form to help us better serve you.

How to change the ePO 4.5.0 and 4.6.0 Agent-to-Server communication port

Technical Articles ID: KB67605
Environment
McAfee ePolicy Orchestrator 4.6
McAfee ePolicy Orchestrator 4.5

For details of all supported operating systems, see KB51109.
Summary
This article explains how to change the Agent-to-Server communication port in ePolicy Orchestrator (ePO) 4.5 and 4.6.
Solution 1
Perform the following steps to change the ePO 4.5 / 4.6 Agent-to-Server communication port.

Stop the ePO services
Ensure all ePO consoles are closed.
Click Start, Run, type services.msc and click OK.
Right-click each of the following services and select Stop:

McAfee ePolicy Orchestrator 4.x.0 Application Server
McAfee ePolicy Orchestrator 4.x.0 Event Parser
McAfee ePolicy Orchestrator 4.x.0 Server

Modify the port value in the registry
CAUTION: This article contains information about opening or modifying the registry.
The following information is intended for System Administrators. Registry modifications are irreversible and could cause system failure if done incorrectly.
Before proceeding, McAfee strongly recommends backing up your registry and understanding the restore process. For more information, see:http://support.microsoft.com/kb/256986.
Do not run a .REG file that is not confirmed to be a genuine registry import file.
Click Start, Run, type regedit and click OK.
Navigate to the following key:

ePO 4.5:[HKEY_LOCAL_MACHINE\SOFTWARE\Microsoft\Windows\CurrentVersion\Uninstall\{474A7C22-C823-401B-A52C-26D876957E5E}]

NOTE: For Windows 2008 the path will be:
[HKEY_LOCAL_MACHINE\SOFTWARE\Wow6432Node\Microsoft\Windows\CurrentVersion\Uninstall\{474A7C22-C823-401B-A52C-26D876957E5E}]

ePO 4.6:[HKEY_LOCAL_MACHINE\SOFTWARE\Microsoft\Windows\CurrentVersion\Uninstall\{73F1BDB7-11E1-11D5-9DC6-00C04F2FC33B}]

NOTE: For Windows 2008 the path will be:
[HKEY_LOCAL_MACHINE\SOFTWARE\Wow6432Node\Microsoft\Windows\CurrentVersion\Uninstall\{73F1BDB7-11E1-11D5-9DC6-00C04F2FC33B}]

Modify the string value AgentPort to reflect the appropriate port. The default value for this port is 80.
Close the Registry Editor.

Modify the value in the ePO database
Click Start, Run, type notepad and click OK.
Add the following lines into the blank Notepad document. Change 80 to the appropriate port number:

UPDATE EPOServerInfo
SET ServerHTTPPort=80
Save the file as DefaultAgentPort.sql in a temporary location on the SQL or MSDE server.

IMPORTANT: For SQL 2000 or SQL 2005 installations, see Solution 2: Alternative Steps for SQL 2000/2005 installations. If you are using this alternate section for SQL 2000/2005 installations, once completed, skip to the heading “Modify the port value in the ePO configuration files” below.

Click Start, Run, type cmd and click OK.
Run the following command for the DefaultAgentPort.sql file on the SQL or MSDE server (command is case-sensitive):

OSQL -d -E -i \DefaultAgentPort.sql

(where is the name of the ePO database and is the folder containing the DefaultAgentPort.SQL file created above)

Example: If the ePO server name is MANAGE, script name is DefaultAgentPort.SQL and the temporary folder is c:\TEMP, the command would be:

OSQL -d ePO_MANAGE -E -i c:\TEMP\DefaultAgentPort.SQL
IMPORTANT: Changes in the OSQL command are required if you are using a named instance of SQL or MSDE, indicated by a \. Refer to the following article for details: KB51588 – How to run SQL scripts provided by McAfee Support using OSQL.

Close the command prompt.

Modify the port value in the ePO configuration files
Click Start, Run, type explorer and click OK.
Navigate to: …\Program Files\McAfee\ePolicy Orchestrator\DB\.
Open Server.ini using a text editor, such as Notepad, and change the value for HTTPPort=80 to reflect the new port number.
Save the file.
Open Siteinfo.ini using Notepad and change the value for HTTPPort=80 to reflect the new port number.
Save the file.
Navigate to: …\Program Files\McAfee\ePolicy Orchestrator\Apache2\conf
Open httpd.conf with Notepad and change the lines below to reflect the new port number:

Listen 80
ServerName: 80
If using VirtualHosts, change:

NameVirtualHost *:80

Save the file and exit Notepad.

Restart the ePO services
Click Start, Run, type services.msc and click OK.
Right-click each of the following services and select Start:

McAfee ePolicy Orchestrator 4.x.0 Application Server
McAfee ePolicy Orchestrator 4.x.0 Event Parser
McAfee ePolicy Orchestrator 4.x.0 Server

Modify settings on remote Agent Handlers (OPTIONAL)IMPORTANT: If you use remote Agent Handlers in your environment, perform the steps below on each remote Agent Handler:
Ensure all ePO consoles are closed.
Click Start, Run, type services.msc and click OK.
Right-click each of the services below and select Stop:

McAfee ePolicy Orchestrator 4.x.0 Event Parser
McAfee ePolicy Orchestrator 4.x.0 Server (may be listed as MCAFEEAPACHESRV if the server has not been restarted since the Agent Handler was installed)
Navigate to: …\Program Files\McAfee\Agent Handler\ apache \conf
Open httpd.conf with Notepad and change the lines below to reflect the new port number:
Listen 80 ServerName: 80
If using VirtualHosts, change:

NameVirtualHost *:80

Save the file and exit Notepad.
Click Start, Run, type services.msc and click OK.
Right-click each of the following services and select Start:

McAfee ePolicy Orchestrator 4.x.0 Event Parser
McAfee ePolicy Orchestrator 4.x.0 Server (may be listed as MCAFEEAPACHESRV if the server has not been restarted since the Agent Handler was installed)

IMPORTANT: If agents were deployed to client systems previously, the agent must be reinstalled on all client computers using the /forceinstall switch to overwrite the existing Sitelist.xmlfile. See KB60555 for detailed information on the specific McAfee Agent versions that allow the /forceinstall switch to work successfully.
Solution 2
Alternative Steps for SQL 2000/2005 installations
These steps replace steps 4 – 6 in the section Modify the value in the ePO database in Solution 1 for SQL 2000 or 2005 installations.

SQL 2005
Click Start, All Programs, Microsoft SQL Server 2005, SQL Server Management Studio.
Click Connect on the Connect to Server dialog box.
Expand Databases and select ePO database.
Click New Query from the toolbar.
Click File, Open, File… and browse to the DefaultAgentPort.sql file.
Select the file, click Open, then click Execute.
SQL 2000
Click Start, All Programs, Microsoft SQL Server, Query Analyzer.
At the Connect to SQL Server dialog, type your authentication details and click OK.
In the Database list box select ePO database.
NOTE: By default, the database list box contains Master.

Click File, Open, File… and browse to the DefaultAgentPort.sql file.
Select the file, click Open, then click Execute Query or press F5.
Related Information
KB66929 – How to change the ePO 4.5 Agent-to-Server communication “secure” port